No edit summary |
No edit summary |
||
| Line 1: | Line 1: | ||
{{ | {{Header | ||
{{Home/ | |title = Getting Started | ||
{{Home/ | |desc = Tutorials for starting on {{SITENAME}} | ||
}} | |||
Welcome to [[WoopMC:About|{{SITENAME}}]]! We're glad you've chosen to join our server community, and we can't wait to meet you. In order to make your experience on the server as simple—and fun—as possible, this page serves as a collection of short guides to help you get started on the {{SITENAME}} Network. | |||
After connecting to {{SITENAME}}, you can join a variety of gamemodes using the Server Selector compass or by interacting with the corresponding NPC. For more information on a specific gamemode, please view the guides below. | |||
{{Spoiler box | |||
|header = Need help connecting? | |||
|content =<span></span> | |||
=== Joining the server === | |||
Before you can get started in any of {{SITENAME}}'s gamemodes or community {{Discord|Discord}}, you must first join the {{SITENAME}} Minecraft server. {{SITENAME}} supports both Java and Bedrock editions on version {{Home/settings|versionReal}} or higher. | |||
If you're unable to connect, or still need help, feel free to [[WoopMC:Contact_us|contact us]] for additional assistance. | |||
==== Java Edition ==== | |||
[[File:ServerInfo Java.png|thumb|right|alt=The server info screen for Java edition]] | |||
# Launch Minecraft under the latest version. From the Title Screen, select "Multiplayer". | |||
# Click the "Add server" button in the lower right corner of the window. | |||
# For the Server Name field, type {{Copy|{{SITENAME}}}}. For the Server Address field, type {{Copy|{{Home/settings|address}}}}. | |||
## You may also wish to enable Server Resource Packs for a more seamless experience when switching to certain worlds or gamemodes. | |||
# Click "Done", then double-click the {{SITENAME}} from your multiplayer list to connect. | |||
==== Bedrock Edition ==== | |||
{{Hatnote|Due to the number of devices supporting the Bedrock edition of the game, the specific instructions on how to connect may differ for you. If you run a console edition of Minecraft, [[Guide:Connecting From Console|additional steps]] may be required.}} | |||
[[File:ServerInfo Bedrock.png|thumb|right]] | |||
# Launch Minecraft and navigate to the "Servers" tab. | |||
# Tap the "Add Server" button. | |||
# For the Server Name field, type {{Copy|{{SITENAME}}}}. For the Server Address field, type {{Copy|{{Home/settings|address}}}}. For the Port field, type {{Copy|19132}}. | |||
# Tap "Save", then select the server and tap the "Join Server" button to connect. | |||
==== Account linking ==== | |||
If you have both Java and Bedrock editions of Minecraft, you can link your accounts so that you share the same player data and inventory while playing on {{SITENAME}}. To do so, follow the Geyser linking setup [[Guide:Account_Linking|here]]. | |||
Please be aware that your Java data takes precedence over your Bedrock data. To unlink your globally linked accounts, join the GlobalLinkServer (as described above for linking) on either Java or Bedrock, and use the {{CMD|unlinkaccount}} command. | |||
}} | |||
{{card | |||
|column=5 | |||
|title1=Survival | |||
|text1=<nowiki/> | |||
'''View server guide''' | |||
Survival is our primary server gamemode. Build, craft, and explore a large open world with custom biomes, player economy, and land claims. | |||
|page1=Guide:Getting_Started/Survival | |||
|pagetext1=View guide | |||
|colorbgbutton1=#e97670 | |||
|title2=Skyblock | |||
|text2=<nowiki/> | |||
'''View server guide''' | |||
Our custom take on the classic Skyblock gamemode. Expand a beautiful island of your choice, farm resources, and increase your level. | |||
|page2=Guide:Getting_Started/Skyblock | |||
|pagetext2=View guide | |||
|colorbgbutton2=#f4ab31 | |||
|title3=Creative | |||
|text3=<nowiki/> | |||
'''View server guide''' | |||
Let your creativity go wild! With large plots, freebuild, contests, and WorldEdit, the only limit to what you can create is the build height! | |||
|page3=Guide:Getting_Started/Creative | |||
|pagetext3=View guide | |||
|colorbgbutton3=#93ceb5 | |||
|title4=Events | |||
|text4=<nowiki/> | |||
'''View server guide''' | |||
Let your creativity go wild! With large plots, freebuild, contests, and WorldEdit, the only limit to what you can create is the build height! | |||
|page4=Guide:Getting_Started/Events | |||
|pagetext4=View guide | |||
|colorbgbutton4=#74a6de | |||
|title5=Discord | |||
|text5=<nowiki/> | |||
'''Join our Discord!''' | |||
Have questions or just want to chat? Join us on Discord and we'll be happy to hear from you! Everyone is welcome! | |||
|pagelink5=https://discord.gg/QYDSunbGNP | |||
|pagetext5=Join us on Discord | |||
|colorbgbutton5=#9b7eb2 | |||
}} | |||
{{Footer/Guide}} | |||
Revision as of 20:05, 23 May 2024
Welcome to WoopMC! We're glad you've chosen to join our server community, and we can't wait to meet you. In order to make your experience on the server as simple—and fun—as possible, this page serves as a collection of short guides to help you get started on the WoopMC Network.
After connecting to WoopMC, you can join a variety of gamemodes using the Server Selector compass or by interacting with the corresponding NPC. For more information on a specific gamemode, please view the guides below.
Joining the server
Before you can get started in any of WoopMC's gamemodes or community Discord, you must first join the WoopMC Minecraft server. WoopMC supports both Java and Bedrock editions on version 1.20.2 or higher.
If you're unable to connect, or still need help, feel free to contact us for additional assistance.
Java Edition

- Launch Minecraft under the latest version. From the Title Screen, select "Multiplayer".
- Click the "Add server" button in the lower right corner of the window.
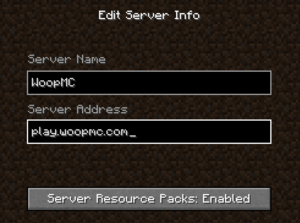
- For the Server Name field, type WoopMC. For the Server Address field, type play.woopmc.com.
- You may also wish to enable Server Resource Packs for a more seamless experience when switching to certain worlds or gamemodes.
- Click "Done", then double-click the WoopMC from your multiplayer list to connect.
Bedrock Edition
- Launch Minecraft and navigate to the "Servers" tab.
- Tap the "Add Server" button.
- For the Server Name field, type WoopMC. For the Server Address field, type play.woopmc.com. For the Port field, type 19132.
- Tap "Save", then select the server and tap the "Join Server" button to connect.
Account linking
If you have both Java and Bedrock editions of Minecraft, you can link your accounts so that you share the same player data and inventory while playing on WoopMC. To do so, follow the Geyser linking setup here.
Please be aware that your Java data takes precedence over your Bedrock data. To unlink your globally linked accounts, join the GlobalLinkServer (as described above for linking) on either Java or Bedrock, and use the /unlinkaccount command.View server guide
Survival is our primary server gamemode. Build, craft, and explore a large open world with custom biomes, player economy, and land claims.View server guide
Our custom take on the classic Skyblock gamemode. Expand a beautiful island of your choice, farm resources, and increase your level.View server guide
Let your creativity go wild! With large plots, freebuild, contests, and WorldEdit, the only limit to what you can create is the build height!View server guide
Let your creativity go wild! With large plots, freebuild, contests, and WorldEdit, the only limit to what you can create is the build height!Join our Discord!
Have questions or just want to chat? Join us on Discord and we'll be happy to hear from you! Everyone is welcome!


