StardustLabs>Tera458 No edit summary |
m (1 revision imported) |
||
(No difference)
| |||
Latest revision as of 01:47, 27 May 2024
This Contributing page is here to explain how you can help the community of this Wiki grow and assist the gathering of information and content about all Stardust Labs projects.
There are different ways to achieve that, which will be explained in the following chapters.
Gathering info[edit]
Identifying and gathering info is important for this Wiki to centralize and keep it updated. Depending on the article, if it is about a biome, a structure, a mob, an item, a feature... Although exploring/testing in-game and taking screenshots to give an overall description of a project element is the best way to start an article, precise info can be difficult to gather. Things like biomes' data, including biome colors, precipitations, temperature, downfall, mob spawn, or biomes a structure can spawn in or loot chance are things that can only be made certain by exploring the projects' files.
If you need any more help or directions of what you can help look for, you can write in the #wiki channel in https://discord.gg/QYDSunbGNP.
Biome info[edit]
Biome info gathering is pretty simple and self-explanatory, despite the amount of info there is to find. You can most of the time find everything just by opening the corresponding biome .json that you will find in \data\project name\worldgen\biome. Note that the info can sometime be mixed up and still work. Right now, we are working on a script able to extract the info from those .json and transform them into different template, allowing us to display this info on the wiki in a more readable format.
If you are experienced in coding and able to help automatize the gathering and reformatting of biomes .jsons. Please inform us on the https://discord.gg/QYDSunbGNP.
Otherwise, it is not possible to list all blocks used only on the surface on each biomes. Gathering that info is crucial, since it is the only missing piece of the puzzle.
Structure info[edit]
Since 1.18.2, structures are linked to biomes through a tag system, each biome having a corresponding tag and or sometimes tags, that we will call category tags, including multiple biome, like is_savanna or is_ocean. This new system adds support between Vanila structures or structure Datapacks and Vanilla or Worldgen datapacks since each worldgen datapack can modify a category tag to include their biome and by doing so, let structures that spawn in that category tag to also spawn in this new biome.
Those category tags can most of the time be found in \data\minecraft\tags\worldgen\biome, and each tags a vanilla structure uses can be found in \data\minecraft\tags\worldgen\biome\has_structure. If a project adds structures, the tags for that structure can be found in \data\project name\tags\worldgen\biome\has_structure.
We are working on a script able to read those tag files and compare them to other Stardust Labs' projects files to list which structures can spawn in each biome and vice versa.
If you are experienced in coding and able to help automatize the gathering and reformatting of those files. Please inform us on the https://discord.gg/QYDSunbGNP.
Mob info[edit]
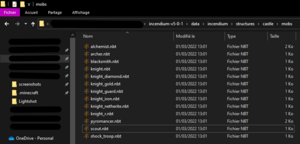
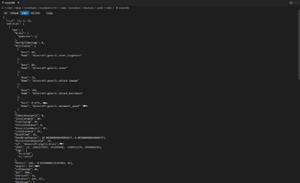
Finding where a custom entity spawn is pretty easy in-game, but finding out their statistics is more tedious.
To do so, you would have to first find the mob .nbt file. If the mob is tied to a structure, you should find it in that structure's folder. Once located, it is recommended to open it using Visual Studio Code with the NBT Viewer extension. Once both are installed, just drag the .nbt into the program, wait, then select SNBT to see the entity code. Inside that code, you will find everything from the entity's health to it's equipment.
If you are unable to find this file, you can go in-game, near the entity you want the stats of, and use /data get entity @e[type=!minecraft:player,sort=nearest,limit=1]. This will give you the stat you specified of the entity.
Right now, we have no program to extract that info and put in the corresponding Entity Template infobox code, so we use a Google Sheet and manually copy and paste each info of each entity using this function :
="{{Entity
|health={{hp|"&B2&"}}
|armor={{Armor|"&B7&"}}
|spawn=[["&B8&"]]
|damage='''Armed'''<br>
''Easy'': {{hp|0}}<br>
''Normal'': {{hp|"&B11&"}}<br>
''Hard'': {{hp|0}}<br>
'''Unarmed'''<br>
''Easy'': {{hp|0}}<br>
''Normal'': {{hp|"&B9&"}}<br>
''Hard'': {{hp|0}}<br>
|speed="&B12&"
|behavior="&B13&"
|drops="&B14&"}}"""
You can also ask for access on the shared Google Sheet in the #wiki channel of the https://discord.gg/QYDSunbGNP.
Item info[edit]
History info[edit]
The History section of a page is there to yarn about the origin and development of a biome, item, structure or mob. The best way to know is this look on the https://discord.gg/QYDSunbGNP or ask the developers when they are available.
Lore info[edit]
The Lore section of a page is the place where you can link and interpret information found in and around a project about the in-game origins of a specific biome, item, structure or mob. This information may also be brought together in the Lore section of a project.
Making an account[edit]

As a security for the users and for the Wiki, you first have to create an account and validate your email adress to be able to do any modification on the Wiki. For this, click create an account at the top right of your screen. Follow the short steps and you should receive an email soon after creating the account. If that is not the case, you can click Preferences at the top right of your screen. Scroll down your User profile and you should find an Email options section at the end. Make sure your email is confirmed here.
Basics[edit]
In the upper right corner of almost all of the Wiki pages, you should see a "Create" or "Edit" button, depending on if the page is created or not. Click this to go into Visual edit mode and start contributing! Different tools are available and will be showcased to you. A more advanced mode, Source editing, or Create source on a new page, can also be accessed, but it is not recommended for new users or people with no coding knowledge.
If you want to create an article, take a look at the other articles in that category, especially how they are formatted. For example, most articles should start by re-adding the Title of the page using the BOLDPAGENAME template like so : Contributing or use the BOLDPAGENAMES template if plural.
Then, write a short description of what the article is showcasing, like this page is doing. You should also link pages related to the page you are creating, even if the pages are not created or if it's from another site like Wikipedia. Also learn to use the different templates at your disposal, all details here.
Feel free to modify an existing article if it contains grammatical errors, info errors, missing info, or is just awkward to read. Do not restructure an article unless said article was not formatted like other articles of the same category.
Small tip: in the Visual editor, writing "[[" will open the link creation window. You can also use the Sandbox link in the top right to access a page that can be used as you please. You can also use that page to test out the edit tools of Mediawiki explained below.
Models[edit]
Depending on the content, a page can be formatted the same way through different projects. Those templates are here to help you create a page easily by completing the pre-made formatting with the missing information. To use them, simply copy whats inside the code blocks and paste it in the Visual editor mode on the page you want to create. All of those models include empty template, to fill them, simply click on them to open their menu with all the information on how they work. To skip a line in a template, use <br>.
Biome page model[edit] |
|---|
{{Biome
|biomeid=
|category=
|temperature=
|humidity=
|precipitation=
|type=
|rarity=
|structures=
|blocks=
|mobs=
|skycolor={{color|}}
|fogcolor={{color|}}
|grasscolor={{color|}}
|foliagecolor={{color|}}
|watercolor={{color|}}
|underwaterfogcolor={{color|}}}}The {{BOLDPAGENAME}} (Description)
(If a TOC appears, use {{TOCleft}} (you can delete this line))
<gallery mode="slideshow">
File:Screenshots needed.jpg
</gallery>

== Spawn rates ==
{{Spawn table}}

== History ==
(Incendium only) (Story behind the creation/conception of the biome by the devs)

=== Lore ===
(Lore behind the existence of the biome)

== Media ==
(All accurate mediatic representations of the page subject, if none, delete the sub-headings and this text, replace with {{WIP}})
=== Animations ===
<gallery>
File:Screenshots needed.jpg
</gallery>
=== Screenshots ===
<gallery>
File:Screenshots needed.jpg
</gallery>
=== Artwork ===
<gallery>
File:Screenshots needed.jpg
</gallery>
=== Video ===
{{#ev:youtube|LINK -eg|720}} (Replace LINK with the link to a youtube video showcasing the subject)

== Changelogs ==
{{Version|Name=|Version=}} (Change made to that biome in specified project version) |
Structure page model[edit] |
|---|
{{Structure
|structureid=
|biomelist=
|mobs=}}The {{BOLDPAGENAME}} (Description)
(If a TOC appears, use {{TOCleft}} (you can delete this line))
<gallery mode="slideshow">
File:Screenshots needed.jpg
</gallery>

== Layout ==
(Only for complex structures) (Description of each section and each rooms in those sections)

== History ==
(Incendium only) (Story behind the creation/conception of the structure by the devs)

=== Lore ===
(Lore behind the existence of the structure)

== Media ==
(All accurate mediatic representation of the page subject, if none, delete the sub-headings and this text, replace with {{WIP}})
=== Animations ===
<gallery>
File:Screenshots needed.jpg
</gallery>
=== Screenshots ===
<gallery>
File:Screenshots needed.jpg
</gallery>
=== Artwork ===
<gallery>
File:Screenshots needed.jpg
</gallery>
=== Video ===
{{#ev:youtube|LINK -eg|720}} (Replace LINK with the link to a youtube video showcasing the subject)

== Changelogs ==
{{Version|Name=|Version=}} (Change made to that structure in specified project version) |
Entity page model[edit] |
|---|
{{Entity
|health=
|spawn=
|behavior=}}The {{BOLDPAGENAME}} (Description)

== Location ==
(Exact conditions/place the entity can appear in)

== Loot ==
(Use the Loot table Template)

== History ==
(Incendium only) (Story behind the creation/conception of the entity by the devs)

=== Lore ===
(Lore behind the existence of the entity)

== Media ==
(All accurate mediatic representation of the page subject, if none, delete the sub-headings and this text, replace with {{WIP}})
=== Animations ===
<gallery>
File:Screenshots needed.jpg
</gallery>
=== Screenshots ===
<gallery>
File:Screenshots needed.jpg
</gallery>
=== Artwork ===
<gallery>
File:Screenshots needed.jpg
</gallery>
=== Video ===
{{#ev:youtube|LINK -eg|720}} (Replace LINK with the link to a youtube video showcasing the subject)

== Changelogs ==
{{Version|Name=|Version=}} (Change made to that entity in specified project version) |
Item page model[edit] |
|---|
{{Item
|attack speed=
|baseitem=
|durability=
|attack damage=
|command=}}The {{BOLDPAGENAME}} (Description)

== Obtaining ==
The {{BOLDPAGENAME}} (Location in a structure or chance of drop from an entity, link included)
<gallery>
File:Screenshots needed.jpg
</gallery>

== Modifications ==
(Indicate if this item can be renamed, if it keeps it's font color when doing so, and if it can be trimmed)
=== Possible upgrades ===
(Modifications that could make the item stronger or better, if none, delete)
=== Downsides ===
(Modifications that could make the item weaker or unusable, if none, delete)

== History ==
(Incendium only) (Story behind the creation/conception of the item by the devs)

=== Description ===
(Description on the item, if none, delete)

=== Lore ===
(Lore behind the creation, existence and use of the item)

== Media ==
(All accurate mediatic representation of the page subject, if none, delete the sub-headings and this text, replace with {{WIP}})
=== Animations ===
<gallery>
File:Screenshots needed.jpg
</gallery>
=== Screenshots ===
<gallery>
File:Screenshots needed.jpg
</gallery>
=== Artwork ===
<gallery>
File:Screenshots needed.jpg
</gallery>
=== Video ===
{{#ev:youtube|LINK -eg|720}} (Replace LINK with the link to a youtube video showcasing the subject)

== Changelogs ==
{{Version|Name=|Version=}} (Change made to that item in specified project version) |
Edits[edit]
Editing and updating existing pages is also important to make sure the information is accurate and that it's presentation is also to the standards and formatting of the rest of the Wiki. Proofreading, adding new media, images, videos, illustrations, or simply making sure the info is as complete and detailled as necessary.
Here are lists of the oldest page edits and newest pages edits to help in knowing what pages to update in priority.
{{#dpl: namespace= |
addeditdate=true | ordermethod=lastedit | order=ascending
}} |
{{#dpl: namespace= |
addeditdate=true | ordermethod=lastedit | order=descending
}} |
[edit]
Another major part of making a Wiki is illustrating, with images, sounds, or videos, everything is more understandable, whether the description was the most detailed or not.
Creating a screenshot[edit]
Taking screenshots of an in-game element is extremely useful, mainly for Biomes and Structures. The only conditions are that you have to use an unaltered version of the project.s you illustrate through the screenshots, have F1 activated (hidden hotbar and chat), an average FOV, and no Ressource Pack or Shader that would make the in-game blocks unrecognizable.
You can also look at the "Screenshots needed" file page to see which pages are missing important screenshots.
Creating a render[edit]
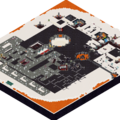
Creating a render allows for a clean, accurate and unobstructed 3D view of a Structure or Entity.
To do so, you will need the Isometric Render Fabric mod. It is also recommended to use the NBT Editor Fabric mod to be able to override the chat character limit that might prevent you from using some commands. Make sure to have cheats enabled and in creative or spectator, then :
- Boot up your Minecraft instance and configure Isometric Renders' keybind for area selection.
- Load up your desired world that you want to make renders.
- Type
/isorenderto load up additional flags:area,block,creative_tab,entity,insanity,item,lighting, andnamespace-areaandentityare priority here.- The
insanityflag is for enabling larger resolutions, use at your own risk.
- The
- You can find your renders in the
renderfolder of your .minecraft directory -\.minecraft\renders.
Structure render[edit]
First, although finding a naturally spawned Structure can work for a overall render, some structures, for example, underground ones or random can be impossible to render accurately, this is why it is recommended to summon the structure or multiple parts of one. Since 1.19, you can use /place structure to easily find and summon one, but for older version :
- Take the target datapack and unzip it. (If it is a mod instead, change .jar extension to .zip and then unzip it).
- Go into the data folder (if mod, the data folder is under the resources folder).
- Now navigate to the data/(datapack or mod name)/structures folder. In there will be nbt files (or more folders containing nbt files).
- In minecraft itself, do
/give @s structure_blockto give yourself a structure block. Place it down. And right click on it to open a gui. - Click the save button in bottom left corner until it says “load”. Then at top for name, put the name and path of the nbt file such as “modid:somefolder/filename” (do not put the folder named “structures” into the path).
- Click the bottom right load button and the piece will spawn above the structure block.
Once that is done, you can follow the next instructions to make your renders :
- Use your configured keybind to select an area in your world based on where you're looking (S by default), finish selecting by pressing the configured keybind again. You can use barrier blocks to help you select the exact corners of the structure. You can reset your selection by using your sneaking keybind +
Your Configured Keybind. - Disable your shaders if you have any.
- Type
/isorender areaand it will render the selected area you have made. - Configure the render to your liking by changing the
Transform Optionssection. For a 3D view, click theIsometricbutton in the Presets options then, if needed, change theRotationin theRendering optionsto make the front or opening of the structure face the bottom left corner of the screen. Make sure the render is accurate to the options you set in your.minecraft/renders/areasfile, if the sides of the render are cut, change theScalein theTransform Optionssection, make sure it is not appearing too small as a .png either. To fix that you can also click and drag the structure's render around and zoom and un-zoom with your scroll-wheel. If some parts of the structure are invisible, make sure all chunks were rendered. - Click on
Exportto export your render . - Once you are done with your area, use your sneaking keybind +
Your Configured Keybindto remove the area selection.
Or
- You can specify coordinates when using
/isorender area, you will need the first X Y Z coordinates and the second X Y Z coordinates of an area. - Type
/isorender area X1 Y1 Z1 X2 Y2 Z2and it will render the selected area you have made (XYZ1 and XYZ2 are the specified coordinates you have chosen). - Configure the render to your liking by changing the
Transform Optionssection. For a 3D view, click theIsometricbutton in the Presets options then, if needed, change theRotationin theRendering optionsto make the front of the structure face the bottom left corner of the screen. Make sure the render is accurate to the options you set in your.minecraft/renders/areasfile, if the sides of the render are cut, change theScalein theTransform Optionssection, make sure it is not appearing too small as a .png either. To fix that you can also drag the structure's render around and zoom and un-zoom. If some parts of the structure are invisible, make sure all chunks were rendered. - Click on
Exportto export your render.
-
Selection area
-
Isometric render mode 1.18 menu
-
Example of top view and chunk render issue
-
Example of a cut render
Entity render[edit]
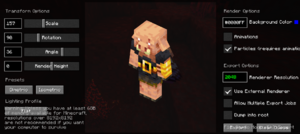
- Disable your shaders if you have any.
- To make a render of an entity, type
/isorender entity ENTITY_idor find the entity you want to render, look at it and type/isorender entity.- NBT tags work with Isometric Renders, it follows the same way of summoning an entity with NBT tags
/isorender entity ENTITY_id {NBT tag}.
- NBT tags work with Isometric Renders, it follows the same way of summoning an entity with NBT tags
- Configure the render to your liking by changing the
Transform Optionssection. Depending on the entity and it's equipment, the rotation may vary. It is recommended make sure theUse External Rendereroption is checked to click theIsometricbutton in thePresets optionsthen change theRotationin theRendering optionsto make the entity look to the bottom left corner of the screen. Make sure the render is accurate to the options you set in your.minecraft/renders/minecraft/entitiesfile. Make sure the entity fits the .png or it will appear smaller than the image box, to fix this, change theScalein theTransform Optionssection. If needed, you can click and drag the mob render around and zoom and un-zoom with your scroll-wheel. If the entity has an animation that could obstruct it's render, like a Blaze, check theAnimationsoption and un-check it until the face of the entity is visible. - Click on
Exportto export your render.
Extracting files[edit]
Reuploading parts of Stardust Labs' projects on the Wiki, like sounds or textures can help illustrate content in new ways. Just note that .png, .gif and .jpeg files have to be at least 256x256 to appear correctly on the Wiki.
Uploading files[edit]
This wiki allows multiple ways of adding files to its library.
MSUpload[edit]
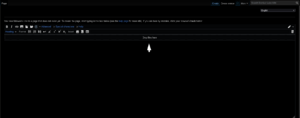
To upload Stardust Labs projects-related files, Edit a page and go in "Source editing mode". Once in that mode, a small window will appear where you can drag the files you want to upload. Select the files from your folders and drag them onto that window. Once all the files are listed, we recommend, if you want, to rename them, so that other users can find files related to the article they are writing or modifying. After that, you can click the "Upload all files" button which will upload your screenshots in the Wiki file gallery. This can take time, but once uploaded, those files will be available to be added into any gallery for a biome, structure, item, or mob, no need to create a page. So do not hesitate to upload all the related files you have.
Upload Wizard[edit]
The Upload Wizard page is a pretty self-explainatory way of uploading multiple files at once, you can access it here, or use the "Upload multiple files" shortcut always accessible on the left of your screen.
Adding files[edit]
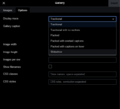
To add those files to a new or existing gallery, in Visual editing, create or click to edit an existing one, then click on "+ Add new image". This will open a window showing your uploaded pictures, you can also search for pictures posted by other users of the Wiki. Once that is done, check the Options to change the display mode if needed.
If you don't have or find any pictures for the article you are writing, you can look for the "Screenshots needed" image to notify other users to add pictures if they have any.
-
Location of the Insert Gallery tool
-
Example of the Insert Gallery tool.
-
Example using the search bar of the Gallery tool, showing screenshots uploaded by other users
-
Example of the Gallery options
Templates[edit]
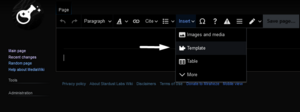
To help you when creating a page and to keep the Wiki formatted, Templates are available. To find them, click on "Insert", then "Template" and search for the Template for the type of page you're creating. For example, if you create a page for a biome, look for the "Biome" template, then follow the instructions inside that template.
Small tip, in the Visual editor, writing "{{" will open the Template window.
Existing templates[edit]
Project[edit]
Displays a link to a chosen project main page, do not use on projects main pages.
{{Project|Project name=...}}
Example : Terralith
BOLDPAGENAME[edit]
Auto displays the page's name in bold.
{{BOLDPAGENAME}}
Example : Contributing
BOLDPAGENAMES[edit]
Auto displays the page's name in plural and bold.
{{BOLDPAGENAMES}}
Example : Contributings
Link[edit]
Makes any word.s a link. if the page exists on the Wiki, it will link to that page. If not, it will link to the Minecraft Wiki.
{{Link|...}}
Version[edit]
Helps you display a project's version with a link to its changelog. Used in descriptions and Changelogs parts of an article.
{{Version|Name=...|Version=...}}
Minecraft version[edit]
Helps you make a link to a Minecraft Java or Bedrock version information/changelog page, if the Edition is not specified, it automatically links to the Java version.
{{MCV|Edition=...|Version=...}}
Example : 1.16.5
L2MCW[edit]
Short for Link to MC Wiki, used to link to a Minecraft Wiki page quickly, also used in infoboxes.
{{L2MCW|...}}
Example : Frog
Tip[edit]
Used to display a small logo which display more text if hovered over.
{{Tip|Info=...}}
Example :
WIP[edit]
Branch of Tip, used to quickly indicate part of a page is a Work In Progress, allows marking of missing info/files by checking this page.
{{WIP}}
InlineInfo[edit]
Used to display info over a choosen text when hovering it.
{{InlineInfo|Text=...|Inline text=...}}
Example : {{#tip-text: Brasil | The biome, not the country.}}
Warning[edit]
Use to display a Warning logo with the reason for the warning on hover.
{{Warning|Warning=...}}
Example :
CheckCheck[edit]
Branch of Warning, allow users to indicate info needs to be verified, a motive can be added. Allows marking of missing info by checking this page.
{{CheckCheck|Reason=...}}
Example :
Spoiler[edit]
Used to hide info behind a clickable box.
{{Spoiler|Text=...}}
Example :
{{#spoiler:show=Show|hide=Hide|boo}}
Biome[edit]
Helps you create an Infobox with most technical information about a biome. Refer to Biome info to fill out the Template.
Structure[edit]
Helps you create an Infobox with most technical information about a structure.
Entity[edit]
Helps you create an Infobox with most technical information about a mob.
Item[edit]
Helps you create an Infobox with most technical information about an item.
EffectLink[edit]
Used to display an effect icon next to a text linking to it's Minecraft Wiki page.{{EffectLink|Name of effect|Text displayed}}
Example : ![]() Regeneration V
Regeneration V
ItemLink[edit]
Used in lists of link to Item pages, displays the a link to the item alongside it's texture.
{{ItemLink|Item=...}}
Example : ![]() Traveler's map
Traveler's map
QuickLinks[edit]
Displays clickeable or unclickeable websites logos depending on if a download external link is provided for the corresponding website. Used for Compatibilities lists.
QuickLinksALT[edit]
Displays clickeable websites logos depending on if a download external link is provided for the corresponding website. Used for Compatibilities lists dependencies.
VideoShowcase[edit]
Facilitates the inclusion of a video or multiple videos on a page. Mostly used in the Showcases Videos section of a project.
Changelogs[edit]
Used only on the Changelogs part of projects pages. Helps you make a line with all the changes of a project's version.
Troubleshooting[edit]
Used only on Troubleshooting pages. Helps you make a window with an issue title, issue description, issue example and issue possible fix.
Markers[edit]
Markers are used when a whole page and its sub-pages are affected. Not to be confused with WIP, Warning and CheckCheck.
Page in progress[edit]
Indicates the page is still being researched/formatted/edited/incomplete. {{Page in progress}}
Update[edit]
Indicates the page has to be reworked to take into account new/updated elements caused by an update. {{Update|Reason=...}}
Discontinued[edit]
Marks a project as discontinued. {{Discontinued|Reason=...}}
Redirects[edit]

Redirects are a type of page made to have multiple wordings of a page title lead to the same page, like the plural of an existing page. Forbidden castles for example, is a redirect page, plural of the Forbidden castle page, where it leads you.
To make a page a redirect page, create one in Source editing and add " #REDIRECT [[Page Name]] " or simply click the Redirect button and follow the instructions there.


